Scenes and the Scene Graph
In your game you probably want a main menu, a few levels and an ending scene. How do you organize all of these into the separate pieces they are? You guessed it, Scene. When you think about your favorite movie you can see that it's distinctly broken down into scenes, or separate parts of the story line. If we apply this same thought process to games, we should come up with at least a few scenes no matter how simple the game is.
Taking another look at the familiar image from earlier:
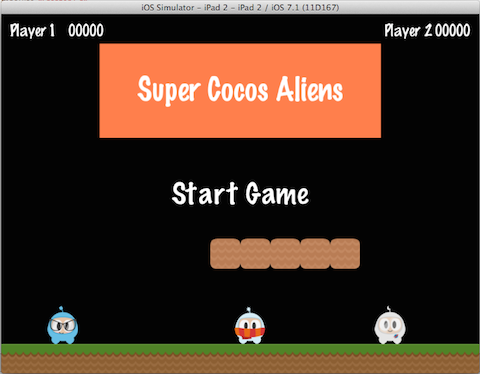
This is a main menu and it is a single Scene. This scene is made up of several pieces that all fit together to give us the end result. Scenes are drawn by the renderer. The renderer is responsible for gathering everything that should be on the screen, and how it should look and getting it there. To better understand this we need to talk a bit about the scene graph.
Scene Graph
A scene graph is a data structure that arranges a graphical scene. A scene graph contains Node objects in a tree (yes, it is called scene graph, but it is actually represented by a tree) structure.

It sounds and looks complicated. I'm sure you are asking why should you care about this technical detail if Cocos2d-x does the heavy lifting for you? It really is important to understand how Scene objects are drawn by the renderer.
Once you start adding Node, Sprite and Animation objects to your game, you want to make sure you are drawing the things you expect. But, what if you are not? What
if your Sprite objects are hidden in the background and you want them to be the foremost objects? No big deal, just take a step back and run through the scene graph on a piece of paper, and I bet you find your mistake easily.
Since the Scene Graph is a tree; you can walk the tree. Cocos2d-x uses the in-order walk algorithm. An in-order walk is the left side of the tree being walked, then the root node, then the right side of the tree. Since the right side of the tree is rendered last, it is displayed first on the scene graph.

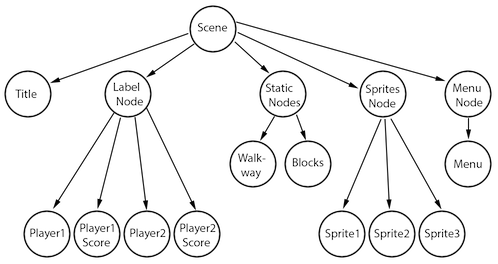
The scene graph is easily demonstrated, let's take a look at our game scene broken down:
This example game scene would be rendered as a tree, simplified to the following:
Another point to think about is elements with a negative z-order are on the left side of the tree, while elements with a positive z-order are on the right side. Keep this in consideration when ordering your elements! Of course, you can add elements in any order, and they're automatically sorted based upon a customizable z-order.
Building on this concept, we can think of a Scene as a collection of Node objects. Let's break the scene above down to see the scene graph uses the z-order to layout the Scene:
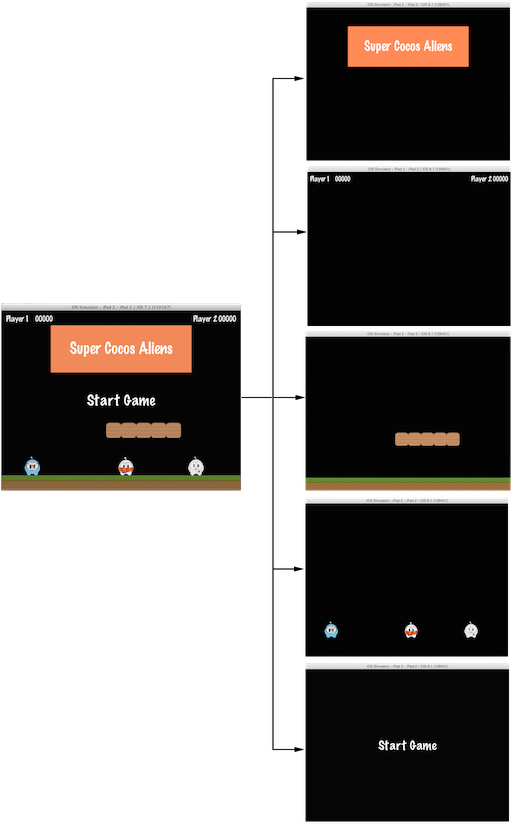
The Scene on the left is actually made up of multiple Node objects
that are given a different z-order to make them stack on top of each other.
In Cocos2d-x, you build the scene graph using the addChild() API call:
// Adds a child with the z-order of -2, that means
// it goes to the "left" side of the tree (because it is negative)
scene->addChild(title_node, -2);

// When you don't specify the z-order, it will use 0
scene->addChild(label_node);

// Adds a child with the z-order of 1, that means
// it goes to the "right" side of the tree (because it is positive)
scene->addChild(sprite_node, 1);
Let's Build A Game - Step 4
Continuing with building our game, we need to think about our game and what Scene objects we will need. Some games use just a single Scene object. This works by removing all Node objects from a scene and replacing them with new Node objects that make up the next Scene. This is a valid approach. Another approach might be to break the game down into a main menu and a game scene. A third approach might be to break the game down further into a main menu, level 1 -> level N and finally a closing scene. You may even add a small transition, often called a cut scene between the vavious Scene objects. Perhaps these cut scenes continue telling a story or just visually stimluate the user while the next level is loading in the background.
In this game, let us take the approach of breaking down our game into an intro scene, game scene and a closing scene. To do this, we need to make 3 almost entirely identical classes, at least to start with. These classes will change as we work on each one of these parts of our game. There are arguments amongst programmers on having to many or to few classes. Let's save that debate for a later time. For now, the goal is to be as clear as possible so those new to c++ and game development don't struggle to learn both at the same time.
Let's add the classes we mentioned above now. Classes are just source files. You can create them from the command-line or your favorite text editor. If you are using an IDE there may even be a wizard you can run if you are new to class creation.
The first class is our intro scene. Let's block out a basic class