Overview
There are mainly two scenarios needs for you to go on this workaround.
Scenario 1
Imagine you already have your own project with a v3 engine embedded, and you want to upgrade v3 engine to new v4, please go to v3 -> v4.
Scenario 2
Imagine that you want to start a new game with v4 engine from scratch, i.e. use
cocos newto create a template project. Besides, you may need cocoapods to manage some dependency for certain reason, please go to Using cmake and cocoapods.
Step by Step
v3 -> v4
Suppose you are using v3.17.2_path/cocos2d-x/build/cocos2d_tests.xcodeproj and want to replace v3 engine with v4 engine.
fetch and pull latest v4 branch.
find the v4 engine project at
cocos2d-x/build/engine/cocos/core/If you want to explicitly specify a build directory, you needs some extra steps shown as bellow
Modify v4 cocos2d_libs CMakeLists.txt.
navigate to path
your_v4_path/cocos2d-x/cocos/, openCMakeLists.txt, sets the minimum required version of cmake, set theCOCOS2DX_ROOT_PATHand includeCocosBuildSetmodule as pictures shows.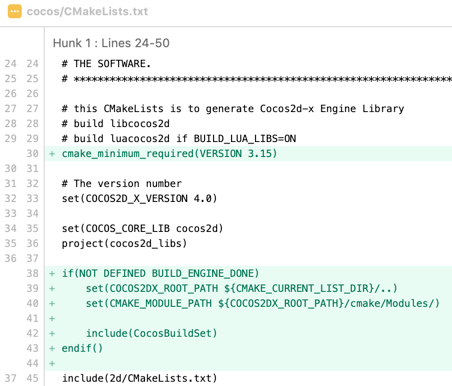
cmake_minimum_required(VERSION 3.15)

...

if(NOT DEFINED BUILD_ENGINE_DONE)
    set(COCOS2DX_ROOT_PATH ${CMAKE_CURRENT_LIST_DIR}/..)
    set(CMAKE_MODULE_PATH ${COCOS2DX_ROOT_PATH}/cmake/Modules/)

    include(CocosBuildSet)
endif()
Explicitly specify a build directory. under folder
your_v4_path/cocos2d-x/cocos/, execute commandcmake -B newPath/build_V4_Engine -GXcode, whers-B <path-to-build>explicitly specify a build directory.Now the v4 engine project is located at
newPath/build_V4_Engine.
open the v3 game test project, namely
cocos2d_tests.xcodeproj, remove the reference to v3 game engine projcet(cocos2d_libs.xcodeproj), then drag the v4 engine project to your game project.select project
cocos2d_testsin the PROJECT group, then go to Build Settings —> Search Paths —> User Header Search Paths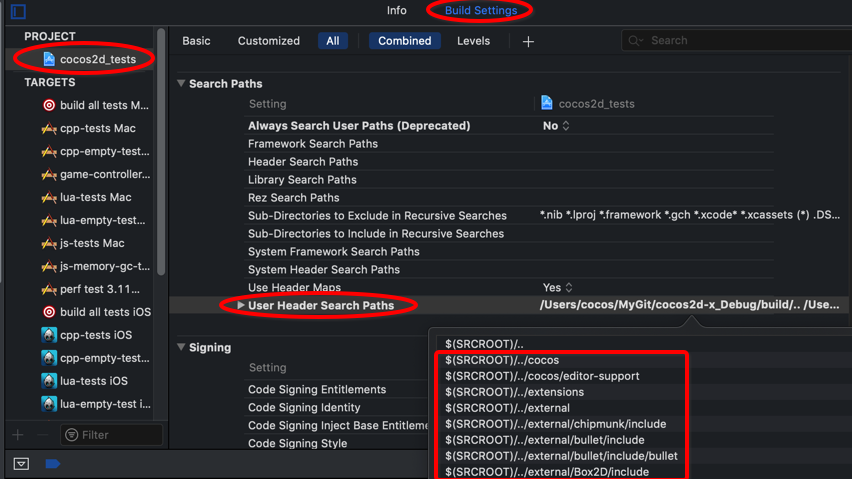
Expand the User Header Search Paths section, double click the Debug or Release.
In the appeared window, delete original v3 engine header search paths and set to currently v4 engine search paths
your_v4_path/cocos2d-x/cocos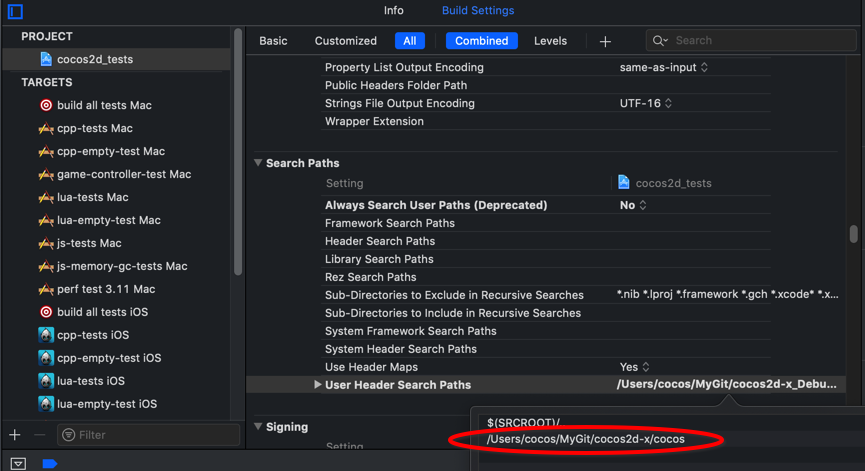
then you can simply add
$(inherited)to User Header Search Paths of your target(cpp-empty-test Mac) in the TARGETS group to inherit from the project settings .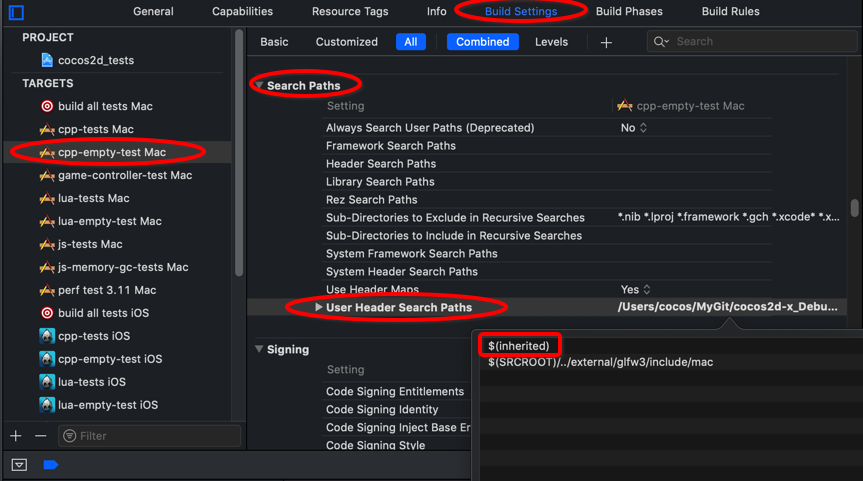
select your target in the TARGETS group, then got Build Settings —> Linking —> Other Linker Flags
Expand the Other Linker Flags section, double click the Debug or Release.
In the appeared window, set the v4 needed libraries.
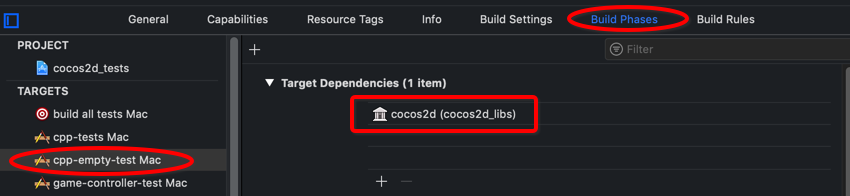
//for you reference, following external library is target for iOS
your_v4_path/cocos2d-x/external/Box2D/prebuilt/ios/libbox2d.a
your_v4_path/cocos2d-x/external/jpeg/prebuilt/ios/libjpeg.a
your_v4_path/cocos2d-x/external/freetype2/prebuilt/ios/libfreetype.a
your_v4_path/cocos2d-x/external/webp/prebuilt/ios/libwebp.a
your_v4_path/cocos2d-x/external/bullet/prebuilt/ios/libLinearMath.a
your_v4_path/cocos2d-x/external/bullet/prebuilt/ios/libBulletDynamics.a
your_v4_path/cocos2d-x/external/bullet/prebuilt/ios/libBulletCollision.a
your_v4_path/cocos2d-x/external/bullet/prebuilt/ios/libLinearMath.a
your_v4_path/cocos2d-x/external/bullet/prebuilt/ios/libBulletMultiThreaded.a
your_v4_path/cocos2d-x/external/bullet/prebuilt/ios/libMiniCL.a
your_v4_path/cocos2d-x/external/websockets/prebuilt/ios/libwebsockets.a
your_v4_path/cocos2d-x/external/uv/prebuilt/ios/libuv_a.a
your_v4_path/cocos2d-x/external/openssl/prebuilt/ios/libssl.a
your_v4_path/cocos2d-x/external/glsl-optimizer/prebuilt/ios/libmesa.a
your_v4_path/cocos2d-x/external/glsl-optimizer/prebuilt/ios/libglsl_optimizer.a
your_v4_path/cocos2d-x/external/glsl-optimizer/prebuilt/ios/libglcpp-library.a
your_v4_path/cocos2d-x/external/png/prebuilt/ios/libpng.a
your_v4_path/cocos2d-x/external/curl/prebuilt/ios/libcurl.a
your_v4_path/cocos2d-x/external/openssl/prebuilt/ios/libcrypto.a
your_v4_path/cocos2d-x/external/glfw3/prebuilt/ios/libglfw3.a
your_v4_path/cocos2d-x/external/chipmunk/prebuilt/ios/libchipmunk.a
select your target in the TARGETS group, goto Build Phases
expand the Target Dependecies section, click the "+" button. In the appeared window, find the cocos2d item itn the list and click the Add button.
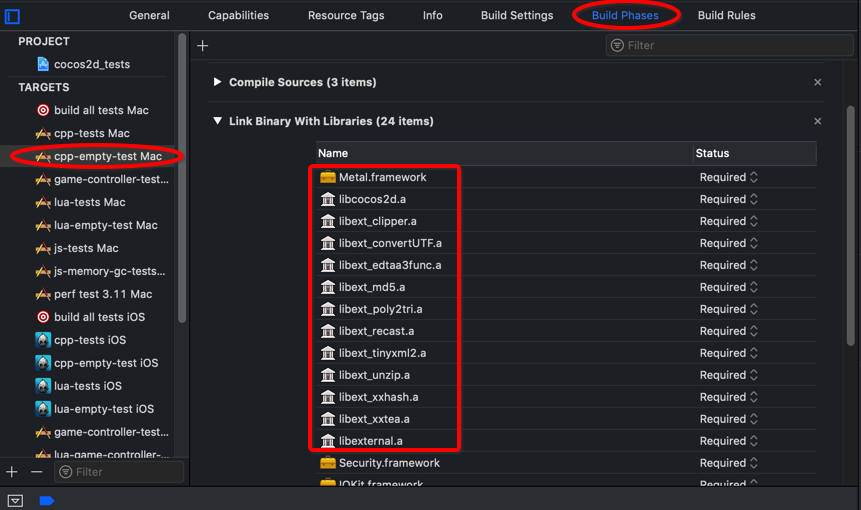
expand the Link Binary With Libraries section, click the "+" button. In the appeared window,
- add the libcocos2d.a
- add external libraries(library name start with "libext")
- add Metal.framework
compile and run.
Using cmake and cocoapods
fetch and pull latest v4 branch.
open new generated project, Select your target in the TARGETS group, go to Build Settings tab
- add
$(inherited)to Other Linker Flags field in the Linking section if no exist. - add
$(inherited)to Header Search Paths and Library Search Paths fields in the Search Paths if no exist. - Add
$(inherited)to Preprocessor Macros filed in the Apple Clang - Preprocessing section if no exist.
- add
skip this if you have already install the CocoaPods.
create a default Podfile
pod initmanage your dependencies in the Podfile.
-
pod install open the
.xcworkspaceand compile it, you will get the following error message,error: ../gamePods/Pods/Target Support Files/Pods-gamePods/Pods-gamePods.debug.xcconfig: unable to open file (in target "gamePods" in project "gamePods") (in target 'gamePods')To fix it, click Pods folder in your game project, and in the right panel you will see its location, click the folder icon, then select the correct path of Pods in the appeared window(Pods path is locate at the same directory as
.xcworkspace).Compile again, got the new error message,
error: The sandbox is not in sync with the Podfile.lock. Run 'pod install' or update your CocoaPods installation.To fix it, modify the .xcconfig file to move PODS_PODFILE_DIR_PATH and PODS_ROOT from last two lines to first two lines, and set the values to
PODS_PODFILE_DIR_PATH = ${SRCROOT}/"path_of_Pods"
PODS_ROOT = ${SRCROOT}/"path_of_Pods"/Pods
"path_of_Pods" specifies the path of your Pods folder. Generally it's your build directory.
Recompile.
Untill now, it can compile successfully.